Showing posts with label Recipes. Show all posts

Thursday, November 4, 2010

Bushels of Blessings Card & Apple Butter Recipe!

Once again it is Thursday & time for me to share my latest project using a fabulous 2 Cute creation! This little gift card, which accompanies some apple butter I made for the neighbors, features the Baby Pumpkin Apple digi & it can be found HERE in the new 2 Cute Store - which showcases all the digital & cling stamps you can purchase! Isn't this digi just the cutest too...especially for yummy fall & harvest gifts?!

Supplies
Baby Pumpkin Apple digi by 2 Cute Rubber Stamps
Coloring Pencils - Prisma
Pens - White Sakura Jelly Roll & Black Copic Atyou Spica Glitter
Cardstock - The Paper Temptress & The Paper Studio
Patterned Paper - Recollections
Sentiment & Rhinestones - Studio G
Ink - Stampin' Up
Flowers - Prima
Eyelets - We R Memory Keepers
Canning - Ball 4 oz quilted crystal jars w/lids (on clearance @ Wal-Mart now!)
Stash - Jute & Pop Dots

And if you would like to make some yummy, delicious, oh so good apple butter of your own, here's the easy & awesome recipe!

Homemade Apple Butter
Fill your crockpot nearly to the top with peeled, cored & sliced apples - I used some from a tree in our backyard & I am not sure of the type but most apples will work. Cook on low setting for 10 hours & it is best to do this part overnight, but that is up to you! After 10 hours, it will be reduced significantly & look black, but don't worry you are still doing it right!! Add 4 cups of sugar, 1/2 tsp. ground cloves, & 3 tsp. of cinnamon. Stir, put the lid back on, & cook on low another 6 hours. Once the 6 hours are up, add 1/2 tsp. of lemon juice & stir, put the lid back on & turn the crockpot off. Let it stand for 1 hour & your apple butter will be ready for canning & giving...or keeping & eating right away! lol! For a great source on quick & easy canning, visit this site HERE. I didn't use her apple butter recipe, but her suggestions for canning were wonderful. Super easy, & while it took longer than 10 minutes for my lids to 'pop,' it was still the most helpful canning site for something simple like apple butter! Also, if you can it, it will keep for up to 1 year in the pantry, but once you open it (or don't can it) it will last 3 weeks in the fridge.

I hope you like my little card & apple butter recipe! Thanks for stopping by & I would love to have you visit the 2 Cute DT site! And, don't forget to visit the new 2 Cute store! There are so many fab stamps to check out, many perfect for the fall season, plus a brand new digi that is awesome! Until next time, Happy Craftin'!

I'm also linking up to the following link parties...check 'em out cause they're awesome!

Show and Tell Green

And these challenges too!

EIC - Inspired by BeiLeXian's Apple Tree Print
Our Creative Corner - Photo Inspiration (cozy, fall feeling!)
Speedy the Cat/Mark's Finest Papers - Holiday (harvest/thanksgiving)
Catch the Bug - Fall/Autumn


Monday, May 24, 2010

Cake Pops....A Little Piece of Sprinkled Heaven!

Hey y'all! Hope everyone is had an awesome weekend! So, how would you like to whip up some super cute and super yummy cake pop? How cute are these bad little buggers?! The first time I saw them I fell in love with how absolutely adorable and delish they looked and knew they were destined to be whipped out in my kitchen for some fabulous end of the year teacher gifts! I definitely have to give props to the absolutely amazing and talented Bakerella! That is where I noticed these fine little sprinkled pieces of cake goodness! Check out her "sweet" site HERE! Her ideas are soooo cool and I love the inspiration I get from just looking at her creations! You can go straight to the cake pops page by visiting HERE.

All you need to make these sweet treats is a box of cake mix (mmm....chocolate anyone?!), a tub of white or cream cheese frosting (i used the vanilla confetti frosting because it came with separate sprinkles...saving $!), some candy melts, and a little lollipop kit from Michael's. The lollipop kit I snagged came with the bags, sticks, ties, and I was able to use a 50% off coupon on it making it super cheap. I was able to use my other coupon on the Wilton candy melts and I definitely recommend this particular type of candy melts! They were a dream to use and work with! Plus, with a coupon, how can a girl go wrong?! You should definitely know that I spent less than $5 on this entire project! Yep...20 gifts plus a few extra for personal late night munching enjoyment...ya can't beat that!

So, simply bake your cake according to the package directions and then let cool. Crumble it in a large bowl and then mix in the tub of frosting until it is thoroughly combined. Using your hands, shape into balls and place on a cookie sheet that has been lined with waxed paper. Refrigerate until firm and then remove. Once they are out of the fridge, pick them up and where they have sat on the baking sheet, on the little flat bottom, insert your lollipop stick. Melt your candy coating according to the package directions and dip the cake pop into the chocolate. This is the tricky part peeps! You want to roll and tap...gently (!) to get all the excess candy off, but you also want the candy to be coating the cake evenly. You also don't want to tap so hard that the cake falls off the stick! And, you may need to refrigerate the cake pops again if they get to soft while you are waiting to dip them...you want to keep them firm so they will be easier to work with.

Once you have them covered in chocolate, either dip them gently into your sprinkles or sprinkle the coating on..whichever you prefer. I dipped mine for better coverage. Next, insert them into a piece of styrofoam, any kind will do, so that they can dry right side up and get a pretty finish to them. After this, simply bag them up and tie on some cute ribbon. I used my Cricut Mini Monograms cart to cut some tags to attach. The paper is Making Memories and I used a Studio G sentiment & SU ink in Riding Hood Red. I also used an SU "To & From" stamp on the back for names. All of the products for the tags I had in my stash and I believe the ribbon came from Michael's 2 for $1 ribbon bin! I have to tell you that these are just so cute and so darn tasty...and I would love for you to try them out too! Let me know if you do and I would love to see how they turn out! Be back soon with some furniture re-do's I am working on, as well as a couple cards! Happy Craftin'!

Oh, and I am also linking up to these fabulous DIY sites! Check them out for amazing inspiration & projects you are sure to love!


Making

The Girl Creative

Monday, May 17, 2010

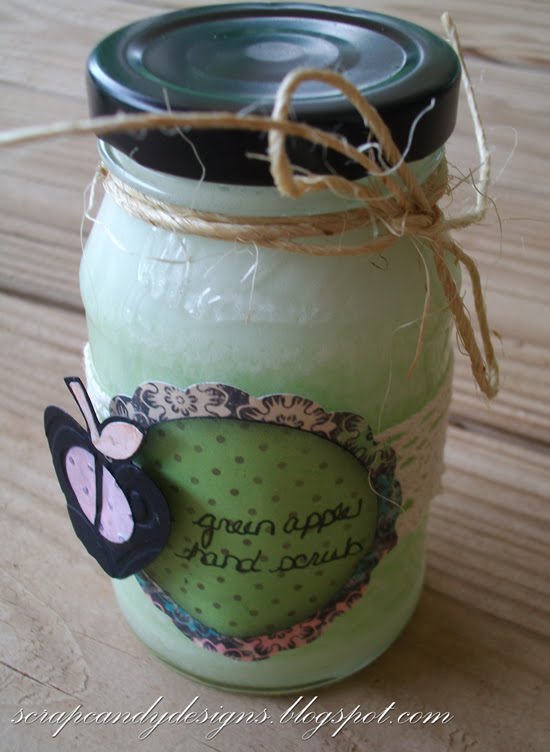
Super Cute & Super Easy Green Apple Hand Scrub!

Hey y'all! I have been meaning to post these for the past week...but, well, you know how things go sometimes! These are the little creations that I whipped up for Mother's Day gifts last weekend and I just love how they turned out! I wanted to make sure I shared them with you because not only are they super easy, but are adorable when decorated, budget friendly, you get the chance to recycle something (yay!) & who doesn't love to get a hand crafted gift?!

First, I must say that while I totally wish the idea was completely mine, it wasn't. I found the most amazing tutorial for the hand scrub at The Gaines Gang. It was such a simple recipe that I knew I wanted to try it out myself & I knew I could put my own personal spin on the whole thing, too. I just want to say thanks to Kate for posting such an awesome tutorial and having a wonderful blog as well!

So, you are going to need two ingredients for these bad boys...sugar and dish soap. Yep, that's it! Well, at least when it comes to the hand scrub part. You are also gonna need some glass jars, scrapbook paper, something to cut your shapes with, spray paint or craft paint, some strong adhesive, ribbon, jute, & a pen. Most of this you will already have around the house, which is were the super budget friendly part of this cutie pie gift comes in! I keep all my glass jars...yes, all of them. From pasta sauce to jelly jars, which is what I used above, they are in my cabinets. Thank God I have an understanding hubby when it comes to me never wanting to throw away anything! These little jars were Smucker's jelly jars in a former life and are the perfect size. I simply spraypainted the lid to give it a finished look (i love the ace hardware premium enamel spray paint - it has great coverage and dries super quick!) and made sure no gunk or label remained on the outside. You want these puppies clean!!

Next, I used some shabby crochet-type ribbon from my stash (it was originally from the dollar tree) and used Aileen's Fast Grab Tacky Glue to adhere it directly to the jar. I cut a scallop circle and plain circle using my Cricut & Mini Monograms cartridge. I used the Home Accents cart for the apple, which I then embossed using the Cuttlebug Divine Swirls & Swiss Dots folders. The black cardstock is The Paper Temptress (love, love, love embossing this paper...so fabulous!), the pink paper is American Crafts, & the patterned paper is from the Recollections Summer Flower collection. I love this paper and it's beautifully shabby chic look! And, the last I checked, they have it at Michael's for 2 for a $1...definitely a bargain! I used some pop dots to give the apple some dimension, and I also inked the edges of all the papers with Stamp Craft black ink to add a little more shabbiness. After adding the title to the tag, I tied some jute (dollar tree as well and this stuff lasts forever!) around the top to complete the look.

Now, on to the hand scrub. Simply pour approximately 2/3 of jar full of ordinary sugar and then add your dish soap. I used some nice green apple scented soap that would be gentle on the skin and have a wonderful aroma while exfoliating. I also loved the pink grapefruit scent and will be making some of that in the near future! While I definitely wouldn't use anything harsh, such as a dish soap with bleach, my son asked me to make these for his teacher's when Christmas comes around again. For them, I believe I will find a nice antibacterial soap to kill a few more germs in the classroom! And, this is definitely a kid friendly project! My son had a blast mixing and adding more soap and sugar as needed, which is what you will probably need to do in order to come to the right consistency...which will be like paste, not too thick and not too thin. I did find however, that you will have to stir these little scrubs every so often to keep it mixed up well. I wanted to add some vintage baby spoons tied to the jar for that purpose, and to scoop out the scrub, but didn't have a chance to get to the thrift store before Mother's Day arrived. Will make sure to do that next time though!

Whew! This was definitely a longer post than I thought it would be! If you hung around with me for this long, you are a dear! Thanks so much for taking the time to read my post and I would love to know if you decide to make your own hand scrub! And, let me know if you do! I would love to see what design you come up with and how you make it unique! I will be back in a few more days with a yummy post...a little something I whipped up for teacher's presents. Lord knows they all deserve a medal after putting up with my teenage terror throughout the year! LOL! Happy Scrappin'!

And, I am also linking my lil' project up to some very cool DIY sites below! Make sure to check them all out and be totally inspired!


MakingThe Girl CreativeSumo Sweet Stuff


Tuesday, December 22, 2009

Peppermint Bark Popcorn Goodies!

Whew! I finally finished up all the neighbors' gifts, school gifts, and family friends' gifts! I have to say I am glad for the small break before I start cooking some of our Christmas meal! At least the kitchen bar will be clean for a few hours! I just wanted to share a yummy recipe & a quick gift idea with you before the holidays! This Peppermint Bark Popcorn recipe is from Our Best Bites, a site I recently discovered and absolutely love. You have to check them out! Now, I am not sure what I did, but mine did not turn out exactly like theirs. However, while different, it was still awesome and has been getting rave reviews! Plus, TJ & I had a blast making it this weekend! We poured everything on the dining room table to mix it and were covered completely in chocolatey, pepperminty, popcorny goo! The best part? Licking it off ourselves when were done! Mmmm!

After letting it set I just bagged it up, tied it up with some cute ribbon from Michael's I received in a swap and made some toppers using one of Prairy Fairy's free digi stamps! Roberta is so sweet and I have had so much fun playing with her images this Christmas! They have helped me make cute gifts for everyone! Make sure to snag them while you can! I used my watercolor pencils to color the image and then I added a little cotton to his hat, which I dabbed with ice Stickles. I also used black Stickles on his buttons, but they didn't show up too well in the photo. The can I set the popcorn in is a recycled Planter's peanut can. I save every can, glass jar, container, etc. throughout the year. And it pays off for quick and easy gifts like this! I just decorated it with some patterned paper by American Tradition Designs and it was done! And, it was recycled so there is less waste in a landfill somewhere; something I am big on anyway!

And this is one of two gift baskets I made for some special friends. Their bags included the rocky road candy, peppermint bark popcorn, chocolate covered pretzels and chocolate covered marshmallows that were dipped in either pecans or crushed candy canes. So far they have been a hit too! Now, if I can just loose all the weight that I know I have put on from sampling, I will have it made! Happy Scrappin'!

"A Proud member of The Lime Light. Click on over to see what we are doing."

Monday, December 14, 2009

Let the Baking Begin! (& a recipe too!)

It's starting to look a lot like Christmas around our house as the baking begins! I truly love to cook and especially bake, which makes this one of my favorite times of the year. Over the next week and a half I will bake so much my feet will hurt, stress myself out, be grateful when it is all over with, and love every minute of it! The candy inside the goody bags is Rocky Road and I got the recipe from my awesome mom in law. Super easy recipe too: Melt 1lb chocolate almond bark, mix in one 7 oz jar of peanuts & one bag of miniature marshmallows, stir & drop on waxed paper with a teaspoon. Super easy and yummy!

These are the gifts for our son's teachers, and a few others at school. The digi stamp & sentiment are by the fabulous Roberta over at Prairie Fairy. And you can snag it as a free download too! Just click here. She has an amazing site and is gearing up to open her own digi store as well, so make sure to check her out!

I used my watercolor pencils on the reindeer, as well as red Stickles on his nose and a tiny piece of cotton for his tail which I then dabbed with ice Stickles. The cute little patterned paper I used for the toppers is by The Paper Studio & it is on clearance at HL. For the tag on the back I used my Cricut & Mini Monograms. The paper is by American Traditional Designs, the snowflakes are Studio G, & the "from" is an SU stamp. I used Studio G & Staz On ink as well.

I absolutely love this digi image and totally got the idea for these gifts from Roberta. I hope the teachers love them! She also put up the "snowman poop" version as a free digi too on Prairie Fairy and I plan on doing some gifts with that one later this week. So make sure to hop on over to her blog (sign up for her blog candy too!) & keep checking back here as I have more holiday crafty goodness to come! Happy Scrappin'!

"A Proud member of The Lime Light. Click on over to see what we are doing."

Thursday, August 13, 2009

Yummy cuppies & a layout

Mmmm....cupcakes! I was in a mood the other day and decided to whip some up for my hubby to take to work for the guys. I love baking and made some red velvet cupcakes with cream cheese frosting that I topped with walnuts. Except the ones for hubby, he doesn't like nuts except in his brownies. A little odd but that is okay because I am plenty odd! They were so yummy and turned out kinda pretty too, dontcha think?

I also got another layout done from our Memorial weekend trip to the Wichita Mtns. These were some shots from the wildlife refuge - it was so cool just seeing the longhorns and buffalo roam. We also seen some adorable little prairie dogs, but the photo didn't come out too well. I just love the scenery though and all the tall prairie grass and gorgeous wildflowers!

For this layout I again used one of Stephanie's layouts from Scrapsketch! It was the Friday Scrapsketch Challenge. I am tellin' ya to go over there right now for great inspiration and ideas to make your scrappin' life easier! The paper for this layout is from the DCWV Green Stack, except for the paper pieces at the bottom which are K&Co. and The Paper Studio. The chipboard is also by K&Co. and ribbon is Basic Grey. The orange rik rak is from my stash (can't remember what brand is but I do remember buying it at Felicia's Scrapbooks in Austin, Texas), along with the little paper flowers I hand cut from some old paper scraps. I also used George to cut the word TALES. The jornaling spot is Heidi Swapp. Oh, and I used an SU scallop punch and inked the edges of the photos with coffee ink by StampCraft.

I am still way super excited to be on the DT over at Creative Twist! If you get a chance hop on over to see what is going on & meet all the new DT members! I am also hoping to do another post later today if I can get something I am working on completed - and I desperately need to catch up on my blog awards! Happy Scrapping!


"A Proud member of The Lime Light. Click on over to see what we are doing."

Monday, July 27, 2009

Ay Caramba!

Those who know me well, know I love to cook! Every weekend I like to try a new recipe out on my family and this week my family just loved it - so I just had to share! I decided to make Ay Caramba! Chicken Spaghetti, a recipe I came across completely randomly! I was actually googling bird house images and found this at The Apron Queen's Reviews. Go figure! Anyway, it completely caught my eye and I ended up making it and am so glad I did! Oh, and the photo came off the Apron Queen's site because I didn't take a picture of mine - we ate it too fast!


Here is the recipe:

3-4 chicken breasts (boneless, skinless, bite-sized pieces)
1/4 - 1 cup colorful bell peppers (diced)
Small onion (diced)
1/4 cup butter or margarine

12 oz of Mexican Mild Velveeta cheese
10 3/4 oz can cream of chicken soup
1 cup milk
10 oz diced tomatoes (optional- with green chiles)
1 package of taco seasoning mix

16 oz of spaghetti (cooked)

1) Put on your apron! And heat the oven to 350 degrees.

2) Prepare the spaghetti per package directions. Drain and set aside.

3) Saute the chicken, bell peppers and onions in butter or margarine in a large nonstick skillet over medium heat until cooked through, for approximately 5-10 minutes.

4) In the same skillet, add the Mexican Mild Velveeta cheese, cream of chicken soup and milk. Heat until melted, stirring frequently. Add the diced tomatoes and taco seasoning mix and cook until heated through.

5) Spoon the spaghetti into a 13x9 inch baking dish sprayed with cooking spray and cover with chicken and cheesy tomato sauce.

6) Bake 15-30 minutes until cheese is bubbly. Serve with a simple salad, garlic bread and tall glasses of sweet iced tea. Save room for fun Reese's cupcakes.

7) Do not forget the secret ingredient. You MUST perform the Chicken Dance at least once while cooking.

My son helped me in the kitchen with this one since it does take a little bit of prep time. And yes, we did do the chicken dance which my husband found very entertaining! I did alter it some to meet my familiy's likes, which meant using onion powder instead of onions and omitting the bell peppers. Also, I used the cilantro & lime Rotel because it is our fav and just adds a little something extra to the flavors in a dish. I also just used regular Velveeta because I could not find Mexican Velveeta for the life of me at the store. Any other time they have it, but when I need it, no. That's my luck. However, my family thought it was perfect just the way it is and I probably won't change a thing when I make it again. It was just so yummy! This recipe makes a large portion. We had enough leftover for all of us to have leftovers for lunch and we all had seconds last night too!

I also wanted to bake some chocolate chip pecan cookies, but didn't get to it so I am gonna bake those tonight while trying to finish my scrapping I need to get done. I got one layout done that I need to post and have several projects I have to finish up for The Lime Light DT. So, you should be hearing more from tonight or in the morning! In the meantime, cook this dish! You will love it!


"A Proud member of The Lime Light. Click on over to see what we are doing."
Related Posts with Thumbnails