Wednesday, May 26, 2010

Chillin' with Artic Friends & 2 Cute Rubber Stamps!

Hey y'all! Hope you are all having a fabulous week so far! I am back with another 2 Cute Rubber Stamps post for ya! I have been absent the past week or so, but am now back & posting on Thursdays instead of Tuesdays. So, I hope you will join me in my move and hop on over to check out my post at 2 Cute Rubber Stamps Design Team!

This adorable little digi stamp is called Artic Friends and you can find it right HERE! I love all of Heidi's stamps and this one just seemed perfect since the weather is so warm here right now, I just want to cool off! I colored the digi with my Prisma pencils & did some outlining with a black Copic Atyou Spica Glitter pen. I also added some Mod Podge Dimensional Magic to the ice they are floating on for a realistic, 3D effect....I just wish it had shown up better! The cardstock is Making Memories, and the patterned paper is The Paper Studio & Miss Elizabeth. The adhesive chipboard is Heidi Swapp, the sentiment is Studio G, the ink is Staz On, and the ribbon is by Stampin' Up! I used Stickles on the cherries and the button & thread are from my stash. I also used my new fav adhesive, Aileen's Fast Grab Tacky Glue, for securing the ribbon and such...this stuff works fabulous and fast! Love it!

I hope you take some time and hop on over to the 2 Cute Rubber Stamps Design Team blog and check out some inspiration from all the DT members! They are a fabulous group of gals...and super talented too! And, check out the 2 Cute Rubber Stamps store too...Heidi's stamps come three ways: digi, cling cushion, and wood mounted! Happy Craftin'!

I am also gonna enter my card into the following challenges! Wish me luck!

Pile It On - Out of the Box (made a winter card during summer!)
Etsy Inspired Challenge - I focused on the beautiful blues in the photos!
Hand Full of Stamps - #28 Get Your Shine On
Paper Cutz Challenge - Patterned Paper, Buttons, & Ribbon
Stamp Something - 2 of Something
Sew Many Challenges - Anything Goes
Crafty Calendar Challenge - The Great Outdoors

Tuesday, May 25, 2010

DIY Rockin' Mod Podge Coasters (They're Up-Cycled Too!)

Hey y'all! I am back again with another DIY project for you to try that is super easy, uber cool, and so cheap, it's practically free! Can't be that, huh?! For those of you that may not know, I am a huge addict of the Mod Podge Rocks site. Amy is absolutely fabulous and the inspiration over there is phenomenal! You must check it out...from furniture redo's to scrapbook LO's there is something for everyone!

I had seen several different crafty peeps make some DIY tile coasters & I have loved how they all turned out...so, I decided to try it myself! We have a sunroom that I am currently in the process of revamping. It should be noted that it doubles as a music room...my hubby plays bass & our son plays drums, bass, guitar, & trumpet. Not only are the hills alive with the sound of music, but so is my house...and the neighbor's! So, these coasters needed to be cool and functional....which is where this wicked cool rock 'n' roll scrapbook paper by DCWV (that I had secretly been hoarding for about 2 years) came in to play.

All you need is some tiles...any kind will do. Ours were leftover in our garage from a kitchen remodel so I snagged a few. I sanded them up a little bit so everything would adhere a little better and then painted the sides black. I tried two methods for this...spray paint & acryllic paint, both I had on hand. I have to say while the spray paint was definitely quicker, the acryllic paint was less messy and offered a little better coverage. Both of them took about the same time to dry. Next, I cut my paper to size, slapped on some Mod Podge (always make sure to smooth out any bubbles!) and gave it a couple extra coats (with drying time in between) to make sure it would be good and waterproof. After they were dry, I added some little felt feet to the bottom so they wouldn't scratch the surface of whatever table they were on! Easy peasy, my peeps! Especially since I had all of this stuff already on hand, and more than likely, you do too!

Now, run right on over to Mod Podge Rocks and be inspired by some very crafty creations from both Amy & some other creative bloggers! I am tellin' ya, you won't regret it! If I don't check this site out at least once a day, I feel like I am not complete! LOL! And, I am also linking this lil' project up to some totally cool DIY sites...check them out too if you would like! Be back soon with my furniture revamps for the same room in a day or two! Happy Craftin'!

DIY Day @ ASPTL


Monday, May 24, 2010

Cake Pops....A Little Piece of Sprinkled Heaven!

Hey y'all! Hope everyone is had an awesome weekend! So, how would you like to whip up some super cute and super yummy cake pop? How cute are these bad little buggers?! The first time I saw them I fell in love with how absolutely adorable and delish they looked and knew they were destined to be whipped out in my kitchen for some fabulous end of the year teacher gifts! I definitely have to give props to the absolutely amazing and talented Bakerella! That is where I noticed these fine little sprinkled pieces of cake goodness! Check out her "sweet" site HERE! Her ideas are soooo cool and I love the inspiration I get from just looking at her creations! You can go straight to the cake pops page by visiting HERE.

All you need to make these sweet treats is a box of cake mix (mmm....chocolate anyone?!), a tub of white or cream cheese frosting (i used the vanilla confetti frosting because it came with separate sprinkles...saving $!), some candy melts, and a little lollipop kit from Michael's. The lollipop kit I snagged came with the bags, sticks, ties, and I was able to use a 50% off coupon on it making it super cheap. I was able to use my other coupon on the Wilton candy melts and I definitely recommend this particular type of candy melts! They were a dream to use and work with! Plus, with a coupon, how can a girl go wrong?! You should definitely know that I spent less than $5 on this entire project! Yep...20 gifts plus a few extra for personal late night munching enjoyment...ya can't beat that!

So, simply bake your cake according to the package directions and then let cool. Crumble it in a large bowl and then mix in the tub of frosting until it is thoroughly combined. Using your hands, shape into balls and place on a cookie sheet that has been lined with waxed paper. Refrigerate until firm and then remove. Once they are out of the fridge, pick them up and where they have sat on the baking sheet, on the little flat bottom, insert your lollipop stick. Melt your candy coating according to the package directions and dip the cake pop into the chocolate. This is the tricky part peeps! You want to roll and tap...gently (!) to get all the excess candy off, but you also want the candy to be coating the cake evenly. You also don't want to tap so hard that the cake falls off the stick! And, you may need to refrigerate the cake pops again if they get to soft while you are waiting to dip them...you want to keep them firm so they will be easier to work with.

Once you have them covered in chocolate, either dip them gently into your sprinkles or sprinkle the coating on..whichever you prefer. I dipped mine for better coverage. Next, insert them into a piece of styrofoam, any kind will do, so that they can dry right side up and get a pretty finish to them. After this, simply bag them up and tie on some cute ribbon. I used my Cricut Mini Monograms cart to cut some tags to attach. The paper is Making Memories and I used a Studio G sentiment & SU ink in Riding Hood Red. I also used an SU "To & From" stamp on the back for names. All of the products for the tags I had in my stash and I believe the ribbon came from Michael's 2 for $1 ribbon bin! I have to tell you that these are just so cute and so darn tasty...and I would love for you to try them out too! Let me know if you do and I would love to see how they turn out! Be back soon with some furniture re-do's I am working on, as well as a couple cards! Happy Craftin'!

Oh, and I am also linking up to these fabulous DIY sites! Check them out for amazing inspiration & projects you are sure to love!


Making

The Girl Creative

Monday, May 17, 2010

Super Cute & Super Easy Green Apple Hand Scrub!

Hey y'all! I have been meaning to post these for the past week...but, well, you know how things go sometimes! These are the little creations that I whipped up for Mother's Day gifts last weekend and I just love how they turned out! I wanted to make sure I shared them with you because not only are they super easy, but are adorable when decorated, budget friendly, you get the chance to recycle something (yay!) & who doesn't love to get a hand crafted gift?!

First, I must say that while I totally wish the idea was completely mine, it wasn't. I found the most amazing tutorial for the hand scrub at The Gaines Gang. It was such a simple recipe that I knew I wanted to try it out myself & I knew I could put my own personal spin on the whole thing, too. I just want to say thanks to Kate for posting such an awesome tutorial and having a wonderful blog as well!

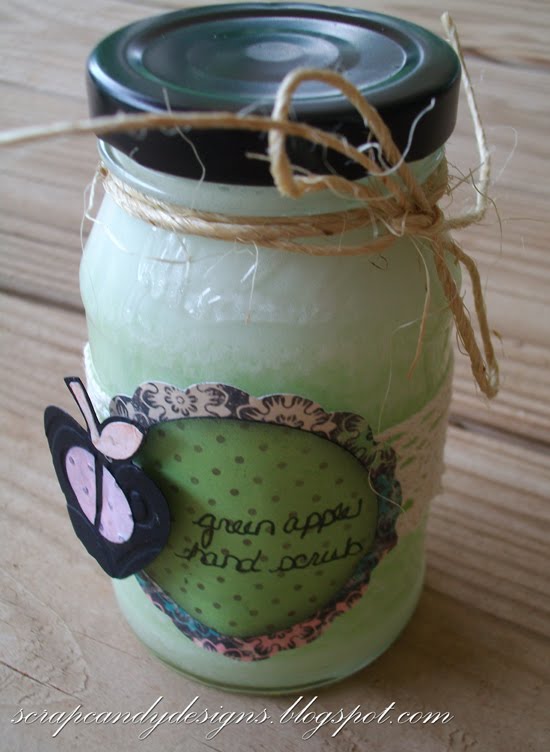
So, you are going to need two ingredients for these bad boys...sugar and dish soap. Yep, that's it! Well, at least when it comes to the hand scrub part. You are also gonna need some glass jars, scrapbook paper, something to cut your shapes with, spray paint or craft paint, some strong adhesive, ribbon, jute, & a pen. Most of this you will already have around the house, which is were the super budget friendly part of this cutie pie gift comes in! I keep all my glass jars...yes, all of them. From pasta sauce to jelly jars, which is what I used above, they are in my cabinets. Thank God I have an understanding hubby when it comes to me never wanting to throw away anything! These little jars were Smucker's jelly jars in a former life and are the perfect size. I simply spraypainted the lid to give it a finished look (i love the ace hardware premium enamel spray paint - it has great coverage and dries super quick!) and made sure no gunk or label remained on the outside. You want these puppies clean!!

Next, I used some shabby crochet-type ribbon from my stash (it was originally from the dollar tree) and used Aileen's Fast Grab Tacky Glue to adhere it directly to the jar. I cut a scallop circle and plain circle using my Cricut & Mini Monograms cartridge. I used the Home Accents cart for the apple, which I then embossed using the Cuttlebug Divine Swirls & Swiss Dots folders. The black cardstock is The Paper Temptress (love, love, love embossing this paper...so fabulous!), the pink paper is American Crafts, & the patterned paper is from the Recollections Summer Flower collection. I love this paper and it's beautifully shabby chic look! And, the last I checked, they have it at Michael's for 2 for a $1...definitely a bargain! I used some pop dots to give the apple some dimension, and I also inked the edges of all the papers with Stamp Craft black ink to add a little more shabbiness. After adding the title to the tag, I tied some jute (dollar tree as well and this stuff lasts forever!) around the top to complete the look.

Now, on to the hand scrub. Simply pour approximately 2/3 of jar full of ordinary sugar and then add your dish soap. I used some nice green apple scented soap that would be gentle on the skin and have a wonderful aroma while exfoliating. I also loved the pink grapefruit scent and will be making some of that in the near future! While I definitely wouldn't use anything harsh, such as a dish soap with bleach, my son asked me to make these for his teacher's when Christmas comes around again. For them, I believe I will find a nice antibacterial soap to kill a few more germs in the classroom! And, this is definitely a kid friendly project! My son had a blast mixing and adding more soap and sugar as needed, which is what you will probably need to do in order to come to the right consistency...which will be like paste, not too thick and not too thin. I did find however, that you will have to stir these little scrubs every so often to keep it mixed up well. I wanted to add some vintage baby spoons tied to the jar for that purpose, and to scoop out the scrub, but didn't have a chance to get to the thrift store before Mother's Day arrived. Will make sure to do that next time though!

Whew! This was definitely a longer post than I thought it would be! If you hung around with me for this long, you are a dear! Thanks so much for taking the time to read my post and I would love to know if you decide to make your own hand scrub! And, let me know if you do! I would love to see what design you come up with and how you make it unique! I will be back in a few more days with a yummy post...a little something I whipped up for teacher's presents. Lord knows they all deserve a medal after putting up with my teenage terror throughout the year! LOL! Happy Scrappin'!

And, I am also linking my lil' project up to some very cool DIY sites below! Make sure to check them all out and be totally inspired!


MakingThe Girl CreativeSumo Sweet Stuff


Wednesday, May 12, 2010

2 Cute Hula Hamster & a FREE Digi!

Hey y'all! I am back with yet another 2 Cute post....a fabulous freebie! That's right...I said freebie! Our challenge this week at 2 Cute Rubber Stamps is to use the Hamster Hula (for which there are 2 versions!) on one of your projects! You can find this adorable little guy right HERE! Just make sure to link up your project to the 2 Cute Rubber Stamps DT blog by May 22nd to be eligible to win a FREE 2 Cute Rubber Stamp!

For this little card, I colored my 2 Cute digi using my Prismas and detailed using a black Copic Atyou Spica Glitter Pen. Now, the fabulous thing about coloring this digi is that I used some of The Paper Temptress' paper! This is the absolute best paper/cardstock I have ever worked with in my life! There are so many options and so far everything I have tried embosses like a dream and receives color soooo well! This particular paper that I printed my Hula Hamster digi on is Laser White Glossy Lustre text weight. Fabulous stuff! Please take the time to visit Patricia's site and view her amazing product!

To finish off my card, I used patterned paper from the Cosmo Cricket Joy Ride line, the chipboard is American Crafts, the ribbon is from Michael's, and the glittered dew drops are from my stash. I popped up the sentiment, which I printed on my computer using the Curlz MT font, for added dimension. And for those of you old enough to remember, yes, the sentiment is an ode to the totally fab 80's song You Spin Me Round (Like a Record) by Dead or Alive! My family loves this song and if you want to reminiscence, or are brave enough to view, you can check out the video HERE! And the sad thing is, I totally remember when my hair was styled like that! And the dude in the background waving the flag? Hilarious! Gotta love the 80's! Oh, and this card is definitely for my hubby! He's gonna love it!

And, you gotta love the chance to win a FREE 2 Cute Rubber Stamp! So make sure you hop on over to the blog, download the FREE digi and whip up something cute! We can't wait to see what you come up with! Happy Scrappin'!

I am also entering my card into the following challenges!

SPCC - Color Challenge #47
Hand Full of Stamps - Get Your Shine On! (#28)
Pile It On - Cute & Cuddly (#18)
The Shabby Tea Room - Chipboard Challenge
Simple Doodles - You're On My Mind (#17)
Colour Create - Color Challenge + Circles
Dare You To Digi - Anything Goes
The Crazy Challenge - Cute & Cuddly
PaperPlay Challenge - Brown + another Color(s)

Friday, May 7, 2010

We have a winner! Woo-hoo!

WOO - HOO! Margreet...you are the winner of my blog candy! Yay you! So happy you won! Just email me your information to crystalbeshear at yahoo.ca and I will make sure to get the goodies out to you!

I do want to say I feel like a big meanie this morning because I had to draw numerous times using RANDOM.ORG because not everyone met the candy requirements...like following my blog. I hated I had to do that too! Everyone always has different requirements on their blogs for their various candy give-a-ways so make sure you always read everyone's...you never know what they might throw in there!! LOL!

Hope to share some teacher's appreciation goodies and mother's day gifts with y'all this weekend so make sure to check back! Hugs & Happy Scrappin'!


Thursday, May 6, 2010

Last chance for blog candy!


Hey y'all! Hope you are having a fabulous week! Just wanted to let you know that my yummy Studio G Blog Candy will be ending tonight at midnight! So, make sure to get your comments in on this post HERE! I will announce the winner tomorrow! Hugs to all!

Related Posts with Thumbnails