Sunday, February 27, 2011

Welcome to the Nest


Hey crafty peeps! This week, this sweet little LO is pulling triple duty - for the Your Memories Here DT, Pile It On! DT, & as a gift I as commissioned to do for a friend's newborn nephew...isn't he cutie?!! She's gonna frame this up later today & I can't wait to see how it looks. I know, I promised a fun, colorful Prima-filled LO today, but this creation was a little unexpected & took up a little more of my time. So, next Sunday I promise to have that super cool Prima LO to share...you're gonna love it! And speaking of love, I loved doing this LO! It was so much fun, especially since I rarely get to do those sweet little baby LO's. It was a blast mixing & matching so many neat products...most of which you can find HERE at the YMH Store. 


Supplies
Patterned Paper - Pebbles, Inc., Prima packaging, GCD Studios, Jillibean Soup, Pink Paislee
Cardstock - Tattered Angels (black - from Spooky Findings kit), Close to My Heart (white)
Cardstock Sticker Border/Tiny Type - Cosmo Cricket
Lace/Rhinestones - Prima
Punch - Martha Stewart, Stampin' Up
Ink - Tim Holtz Distress Ink (walnut stain)
Diecuts - Cricut Jasmine Cartridge (title), Cricut Hoot 'n' Holler Cartridge (branch & leaves)
Chipboard - Top Line Creations
Adhesives - Glue Glider Pro, Pop Dots, Aileen's Fast Grab Tacky Glue


This week the challenge over at PIO is Fancy Folds; you can either make a tri-fold card or, if making another project, any style of fancy folding. For my fancy folds, I created the photo corners by using a border punch & then folding them to create the fancy corner. I love how they turned out & that they make the cutie baby photos stand out a little more. I do hope you'll join us this week at PIO, but don't forget to visit YMH either! The YMH DT Blog is full of fab inspiration & the YMH Store is filled to the brim with amazing goodies at awesome prices! Make sure to check back later this week for my next crafty post...until then, Happy Craftin'!

I'm also "Piling It On" for the following challenges...LOL!

PIO - Fancy Folds/Tri-Fold Card
Catered Crop - FTR6 (patterns, mix & match, a lil' black, distress inks, punches, ribbons, diecuts, squares)
Cupcake Inspirations - Photo Inspiration (inspired by sweet, cute images & lovely colors!)
EIC - Inspired by THIS at The Hidden Alphabet
ScrapFit - Color Combo

Friday, February 25, 2011

Road Trip w/Cosmo Cricket


Woo-Hoo! Happy Friday, y'all! It is the weekend & I am so happy for that. I absolutely love spending time with my family so the weekends are always my favorite part of the week! And to kick this weekend off, I thought I would share a LO showcasing a little weekend get-away we took last month to Waco, Texas. We were taking our adorable cousin, Shane, back home after college break & decided to take our fur baby, Sid, with us on his first road trip. Yes, his first! He's been out & about before, but we've always kenneled him when we take trips. However, this one was last minute & the vet's office was closed so he joined us. I must add that he loved it & was the best little traveling buddy!! 


Supplies
Patterned Paper & Embellishments - Cosmo Cricket (Joy Ride Collection)
Cardstock - The Paper Studio
Letters - Cricut Mini Monograms Cartridge
Date Spot - Cosmo Cricket (Material Girl Collection)
Adhesives - Glue Glider Pro, Pop Dots


Once again I am using lots of Cosmo Cricket products. I've had this kit kicking around in my stash for awhile & had only used it once before. Why, I don't know. This kit is super fab & I've got lots more plans with it. I've totally been on a Cosmo Cricket free for all lately, but promise to take a break shortly! LOL! I also loved how the letters turned out; the little stitched cuts in the letters remind me of the highway & have great texture too. Love my Cricket! So, check back Sunday for another Your Memories Here post...that will feature some amazingly cool Prima products. It will be a bright, colorful & super fun post! And if you wanna grab some Cosmo Cricket yummies for yourself, check out the YMH Store right HERE...you'll be glad you did! Happy Craftin'!

Wednesday, February 23, 2011

Snow Day...with Cosmo Cricket!


Thanks to all the winter weather Oklahoma got a few weeks ago, I was able to get lots of photos to keep me busy scrappin' for months! And since the kiddos were out of school A LOT, our son & his bestie spent lots of time together. These photos were taken after our second blizzard; as you can see, the wind blew so hard there were spots of bare grass & then drifts that got 4 feet high. The boys had so much fun, as did our fur baby, & I had a blast scrappin' these photos using my new obsession, Cosmo Cricket's Sugar Rush Collection! Usually I only post once a week for the YMH DT, but with so much inspiration thanks to this line, expect more than that for the next few weeks..lol! I got THIS fab kit from Your Memories Here & there are two different versions of it. You must check it out & get one for yourself...the kit is very versatile & is loaded with goodies! Oh, and I also got the LO sketch idea from my recent Scrapbooks, Etc. magazine; it was a 2 page LO that I switched up & converted to 1 page. The background paper is also from YMH but is Prima & I thought it went soooo well with the Cosmo Cricket line...fun, huh?!


Supplies
Cardstock - Close to My Heart
Patterned Paper - Cosmo Cricket (Sugar Rush Collection), Prima
Journaling Spots - Cosmo Cricket (Material Girl Collection)
Punch - Stampin' Up
Velvet Letters - Dollar General
Pen - Black Fine Point Sharpie
Snoflake, Ribbon Trim, Scalloped Paper Trim, Adhesives - Stash


See, I promised lots of Cosmo Cricket yumminess coming in the next few weeks! lol! I have another LO I'm finishing up today that features Cosmo Cricket's Joy Ride Collection that has been setting in my stash for months. Don't know why I hadn't dug into it that much before, but boy am I digging into it now! Make sure to visit the YMH DT Blog for lots of yummy inspiration & the YMH Store for fab deals & goodies! Check back soon for some more fun projects...until then, Happy Craftin'!

Sunday, February 20, 2011

Together is Happiness...


I am in LOVE...with Cosmo Cricket's Sugar Rush Collection!!! Oh my goodness it is fabulous & makes my little heart skip a beat! I was so excited when I get this fab kit in the mail from Your Memories Here & had whipped up this LO within hours of receiving it. I am so blessed to be on the YMH DT & Kristina, the owner, is so super awesome! You must, must, must check out her store for amazing deals. This Cosmo Cricket kit can be found HERE & is only, get this, $10!!! Yes, $10! And not only that, but you have two versions of this Sugar Rush Kit to choose from. So get your buns over there while she still has some stock...they are definitely gonna sell out soon!


Another reason I love this layout is because it partially features our ROCKIN' cousin, Shane. Shane & I did some major goofing off for the camera on New Year's Eve & the photos really represent the fun we have together. He is such a big part of our family...one of our youngest cousins on my hubby's side, he is more like our son. He calls us Mom & Dad, and despite the fact that he lives over 5 hours away from us in Texas, we drive down to get him every chance we get. He is a freshman in college this year, is majoring in aviation mechanics, & is pulling straight A's. We are sooooo proud of him! Really lookin' forward to him coming up to visit us for spring break, too! And yes, in case you are wondering, he does have parents ( & they are awesome too!) but he is so much like my hubby it is eerie...hence his nickname, Little Jethro.


Supplies
White Cardstock - Close to my Heart
Punch - Martha Stewart
Ribbon/Adhesives - Stash


Thanks so much for stopping by & letting me share my LO with y'all! I had so much creating it & have so much product left to play with...so get ready for the Cosmo Cricket craziness that is gonna hit! LOL! I would love it if you would visit the YMH DT Blog & check out the amazing inspiration the other DT gals provide. Also, make sure to check out the YMH Store. Trust me, you DO NOT want to miss out on the Cosmo Cricket Sugar Rush kit. Plus, there are so many new products coming in from Prima it's almost overwhelming, but super exciting too! There is always a sale going on & the pricing is fabulous...you'll love it! I'll be back soon with some more craftiness, but until then...Happy Craftin'!

I'm also entering my happy lil' LO into the following challenges!


Moxie Fab World - Tuesday Trigger
Scrapping the Music - Inspired by lyric "she needs new faces"
Happy Scraps - Punches
Really Reasonable Ribbon - Spring
EIC - Inspired by the colors in THIS @ Claylicious' Etsy Shop

Thursday, February 17, 2011

What's Cookin'? (good lookin'...i couldn't resist!)

"Hey good lookin'!, Whatcha got cookin'? How about cookin' something up for me?"
~~~~~~~~~~~~~~~~~~~~~~~~~~~~~~~~~~~~~ 

I'm sorry...I couldn't resist! I used to love that song by Hank Williams Sr. when I was little and matter of fact, I still do. I also absolutely love to cook (my stepfather calls me Miss Betty..after Betty Crocker...lol!) so getting to play with this new release from AiFactory was a definite treat for me! With the 'In the Kitchen' Digital Stamp set from AiFactory you get a total of 11 stamps...and each one of them are awesome & fun so go HERE to grab your own fabulous set! You can also buy the In the Kitchen Set already colored in two wonderful shades...just go HERE & HERE! I can also see this darling apron printed on some fun patterned paper & pieced together, especially with some retro or vintage inspired paper. You will be so glad you grabbed this set because I can see these cuties used on everything from recipe exchanges, to barbecue invitations & more! I also had a blast using theses stamps to make this card. It was fun to dress it up & add a little something special to the apron, as well as adding those fun dimensional glossy accents to the cuppies. I also added some black puff paint to the bottom of the apron for a more dimensional aspect. It doesn't show up too well, but it feels so cool! lol!


 Supplies
Coloring - Prisma Pencils
Patterned Paper - Sassafrass (cherry delicious collection), Cosmo Cricket (joy ride collection)
Cardstock - Creative Memories
Ink - Tim Holtz Distress Ink (walnut stain)
Pens - Sharpie (black med. point), Sakura Jelly Roll (white)
Paint - Black Puff Paint by PolyMark
Pearl Trim - Offray
Glossy Accents - Dimensional Magic by Mod Podge
Ribbon/Paper Trim/Adhesives - Stash

So what are you waiting for? Hop on over to the AiFactory Challenge Blog & play along with our current 'Food' challenge. The prize is fabulous & there's always a Top 3 too! Plus, the DT provides some fantastic crafty inspiration. Make sure to check back later this week for another fun post featuring some always fabulous YMH goodies & until then, Happy Craftin'!


I'm also entering my card creation into the following challenges!
Stamptacular Sunday Challenge - Lovin' from the Oven
Catered Crop - FTR5 (cardstock, black ink, ribbon, repeating patterns, scallop trim)
Little Claire's Designs - Anything Goes
DYSU - Dots (small blue polka dot paper!)
Simply Create - Bright & Bold
Creative Card Crew - Friendship
EIC - Inspired by the retro feel of THIS at Glow Girl
Cupcake Inspirations - Photo Inspiration (inspired by baking that yummy cuppie!)
Digi Stamps 4 Joy - Going Sentimental
Paper Sundaes - Pick Your Sundae Toppings (pink & distressing ink)

Monday, February 14, 2011

You Gotta Have Faith!

Do you remember that song? The one by George Michael that was so popular in the late '90's? I soooo loved that song...and well, I still do! But, my faith has changed & grown on so many different levels, and it is so important to me & a big part of who I am. So, for this week's Pile It On! DT Challenge, Love Plaid, I decided to whip up this simple but lovely little card featuring a hint of plaid. I haven't made a simple, Cricut based card in so long & I really miss it. In fact, it has been a little while since I have given my Cricut some attention because I have been so into my stamping. However, I am making an oath to bestow more love upon the little guy starting now!! We used to be besties & are going to be again...besides, I need to break out those new carts I got for Christmas! LOL!


Supplies
Diecuts - Cricut (George & Home Decor carts)
Cardstock - Core'dinations Jenni Bowlin Collection
Patterned Paper - Pink Paislee Queen Bee Collection
Sentiment - Michael's
Ink - Staz On, Tim Holtz Distress (walnut stain)
Pearls & Crystals - Prima
Plaid Ribbon, Paper Trim & Adhesives - Stash


Thanks so much for stopping by & visiting again...I really appreciate it! I would also love it if you swung on over to the PIO Challenge Blog & show us your love of plaid. Besides, you will be blown away by all the fab inspiration & you will love this week's amazing sponsor...PaperCraftingWorld.com! Make sure to stop by soon to see what I'm "cookin' up" for AiFactory...your gonna love it! Happy Craftin'!

I'm also entering my card into the following challenges!

PIO - Love Plaid
Speedy the Cat - Sketch
Moxie Fab World - Tuesday Trigger (inspired by the browns, creams, dark chocolates & the vintage feel! and, all that chocolate makes my heart happy, hence the red!)
Little Claire's Designs - Anything Goes
CCEE Stampers - Embossing
Stampin' with the Dragon - Anything Goes
Our Creative Corner - Cut It Out
DYSU Challenge - Ribbon
Annabelle Stamps - Polka Dots
The Pixie Cottage - Ribbon
Fab'n' Funky - Tempting Texture
Quirky Crafts Challenge - Dots/Spots/Stripes & Embossing
OLLCB - For Someone Special
Simply Create - Bright & Bold
Creative Card Crew - For a Loved One
Card Creations & More - Black, White + 1 More Colore
Creative Belli - Jewelry (used pearls & crystals)
All Sorts - All About the Sentiment


Sunday, February 13, 2011

Shabby Flower Tutorial & a Winter Wreath!

It's a beautiful Sunday in my neck of the woods today & I hope it is where you are also! For the past several weeks we have been dealing with A LOT of snow & I am so very glad to see it warming up...we are even supposed to get into the mid 70's later this week - yay! However, it's still technically winter so I wanted to share a winter themed wreath I whipped up for the Your Memories Here DT this week. I'm also gonna share with you a lil' tutorial on how to make these gorgeous shabby flowers as well. So get ready for some fun...& a kind of lengthy post!


I have been noticing a lot of these yarn wreaths in the blogosphere lately & wanted to try my hand at one. I had this gray yarn sitting around for a scarf I was gonna make for our fur baby (yes, doggies need scarves too!) & decided to use it. BTW, I love gray...everything gray! Dark gray, light gray, heather gray, gray sweatshirts, gray sweatpants, gray t-shirts...bring on the gray! Silly I know, but that's just me! I picked up the 12" foam wreath form for a buck at my local $ Tree & that is pretty much all that this wreath cost me since I had all the other items on hand...cool, huh?! Also, all of the paper I used was leftover from other YMH projects...a perfect project for scraps! A gal can never go wrong with cheap, fabulous home decor!! To make the wreath, I simply wrapped yarn around the wreath frame, making sure to keep it taut, & secured it at the end. Very simple. I did use my Tattered Angels glimmer mist to dye the Prima lace that lovely shade of orange & that tulle, which was recycled from a past gift, used to be a crisp white until I made it that fab grungy color, again using my much loved & adored glimmer mists!


The inspiration for the handmade shabby flowers came when I stumbled upon this blog HERE. It was totally by accident that I discovered Irene's blog, Crafty Girls Workshop, & that the first post I seen was for these gorgeous flowers! I knew right off the bat that I would be making these & they would be going on this wreath. I came up with my own little tutorial to share with you crafty peeps, but do take the time to visit Irene's blog HERE...you will definitely be glad you did because she has some awesome ideas!


Step 1 - Cut 8, 3" circles out of double sided patterned paper ( i went ahead & distressed mine in the pic & for some of the flowers I also used 2" circles.)

Step 2 - Layer them, poke a hole in the center, & add a brad (you won't see it so any will do!)

Step 3 - In the sink, starting w/the 1st layer, wet the paper & begin to crumple it. Work from the top to the bottom until you get it all ruffly & tight..just like a flower bud.

Step 4 - Now that it is all crumpled, let it dry for a bit, at least a 1/2 hour or so.

Step 5 - Now that it has dried a bit, start to shape the flower very carefully by unfolding some of the layers until you achieve the effect you want. Now, you get to let it dry some more!

Step 6 - Once it is dry, which will take a full 24 hours, you can add some glimmer mist to accent those gorgeous layers you've got going on. It should be noted I went ahead & sprayed on my glimmer mist while the flowers were still wet. I figured since they were already wet, why add more drying time! It worked like a charm, but I definitely recommend making these flowers at least 1 day in  advance of a project. Definitely not a last minute embellishment due to the length of drying time & patience required! Also, trying to speed up the drying time using a hairdryer doesn't really work too well. I tried it & failed so you don't have too...LOL!! All the flowers were attached with a hot glue gun as well...those babies aren't goin' anywhere! ;)


Supplies
Patterned Paper/Crystals/Lace - Prima
Glimmer Mist & Glimmer Glam - Tattered Angels (orange, fall breeze, & sand)
Additional Patterned Paper - SEI & Pebbles, Inc.
Crackle Accents/Distress Ink - Ranger
Chipboard - Melody Ross
Decorative Pins - Jillibean Soup
Yarn/Tulle/Adhesives - Stash


I have to admit, I just LOVE how these flowers turned out! Even my hubby & son thought they were pretty cool, which says a lot! The kiddo of course loved the whole crackle technique I used on the butterfly...kinda like magic the way it works! I can't wait to make some more of these because they really were simple & would look beautiful on some cards or layouts. And speaking of cards and layouts, don't forget to visit the YMH DT blog for some fab inspiration! The DT gals have really been making some great projects, including home decor items, using lots of new Prima goodies! And if you want to get some of the items I used in my wreath, simply visit the YMH Store! There are some gorgeous Prima, Tattered Angels, SEI & Pebbles, Inc. products there for you to check out. Plus, there is always a sale going & more new goodies coming in every day... especially since so much fun stuff was just released at CHA!


Make sure to check back soon for another PIO post & later this week for something I'm "cookin'" up for AiFactory! Until then, Happy Craftin'!!!!

Linking up to this rockin' challenge!

Moxie Fab World - Shimmer Sprays Challenge

I'm also linking my wreath up to the following link parties!

Show and Tell Green


Join  us Saturdays at tatertotsandjello.com for the weekend wrap 
 up           party!


giveaways

HouseofHepworths
Transformation Thursday

Thursday, February 10, 2011

Cutie Patootie Paper Wreath!!


Happy Thursday crafty peeps! I was totally inspired earlier this week when I seen a post about these awesome paper wreaths. I instantly fell in love & knew I would be whipping up one right away! And not only is it easy peasy, it is uber cheap. As in it only cost me $1...yes, $1 - I had everything on hand but the 12" round foam wreath I picked up at my local $ Tree. Super cool, huh?! So, how do you whip up one of these bad boys for yourself? First, visit this amazing post HERE on Two Girls...Being Crafty for amazing inspiration! That is where I found myself totally falling in love. They actually have 2 tutorials for 2 different paper wreath styles & trust me, you'll want to check out both! Now, what you'll need to gather is:


5-6 sheets of double sided 12x12 patterned paper (i used Cosmo Cricket's Material Girl line)
Handy, dandy glue gun
12" foam wreath (you can always go bigger, just add more paper)
Ribbon (if you want to add a bow...)
Paper Trimmer
~ i also used my Glue Gun Pro to adhere the ends of paper together, but you can use your trusty glue gun! ~


So now you're ready to cut your paper! I cut each piece of paper into 1"x6" strips. After all that cutting, I used my Glue Gun Pro (love this gadget, so easy to use & no glue gun burns for me!) to adhere the end of each strip. Then, I simply started attaching them to my wreath form & added a bow (upcycled from a Christmas gift again!) when I finished. Again, visit Two Girls...Being Crafty's post HERE for a great instructional photo when it comes to attaching the pieces of paper to the wreath. I'm tellin' y'all, I love their web site...and that name is simple, to the point & adorable as they are! I'd love to see what you create using this idea too...leave me a link & I'll be sure to visit ya! I've also seen these wreaths made with recycled cards, magazines, & wrapping paper so this is definitely a great recycling/upcycling idea too. Now I have to go whip up some more of these bad boys!! Happy Craftin'!

I'm also linking up to the following linky parties...woo-hoo!


Sunday, February 6, 2011

Beautiful Freaks...


Happy Sunday my crafty peeps! I am back to share another LO for the Your Memories Here DT. Yes, it has a Halloween theme & it is nearly Valentines Day, but I couldn't resist getting some more current photos scrapped & using these fun Prima & Tattered Angels products from the Your Memories Here Store!


Working with transparencies really challenges me. Not sure why, but I always make it more difficult than it is. However, I have used them twice & always love the outcome! I wanted to make sure I gave you a shot of the LO laying flat, as well as displayed....transparencies are really a lot of fun. (and yes, these photos were taken prior to the record setting blizzard hitting Oklahoma this past week!) I did hand cut this transparent sheet & I also made the tulle rolled rosette flowers. The velvet letters started out as white, but with a little bit of glimmer mist, I got them just the right shade. This LO was just a blast to put together & a great way to challenge my creativity a little!


Supplies
Transparency/Patterned Paper/ Flowers/Bling/Lace - Prima
Ribbon/Glimmer Mists/Chipboard - Tattered Angels
Velvet Letters - Dollar Tree
Cardstock Alpha/Journaling Spot/Adhesive Cardstock Buttons - Jillibean Soup
Distress Ink - Tim Holtz (walnut stain)
Metal Tag - Making Memories
Tulle/Adhesives - Stash


As always, thanks so very much for visiting; I really appreciate all the comments & peeks that I get, too! If you have a moment, hop on over to the YMH Store to get some fabulous new Prima goodies that are gonna ship at an amazing price, as well as check out some new Cosmo Cricut kits...they are perfect for Valentine's Day!! And if you need some inspiration, visit us at the YMH DT Blog...the ladies have really been putting up some spectacular work lately! Until next time, Happy Craftin'!

I'm also entering my LO into the following challenges!

Creative Scrappers - Sketch #141
Scrapping the Music - Inspired by "ripped around the seams" lyric

Saturday, February 5, 2011

Falling in Love...w/2 Cute Rubber Stamps!
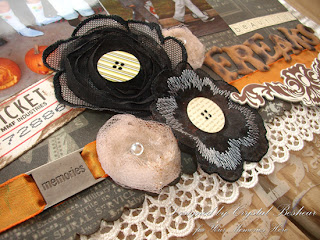
Happy Saturday everyone! Hope you are all having a fab weekend! I wanted to pop back in to not only share a card, but also let you know all the deets to win a $15 gift certificate to 2 Cute Rubber Stamps. My card features an adorable digi stamp called Little Angel & it is one of many that you could buy if you win the gift certificate! So what do you have to do? Well, hop on over to 2 Cute Rubber Stamps HERE & check out all the deets, play along with the Valentine challenge, & you will be entered to win. It's that easy! 


Supplies
Coloring Pencils - Prisma
Rub On Quote - American Tradition Designs
Cardstock - Close to My Heart, The Paper Temptress
Patterned Paper - K&Co.
Flowers - Prima
Brads/Bling - Making Memories
Stickles - Ranger (i used them on her wings & only wish they showed up better!)
Punch - Martha Stewart
Trim/Ribbon/Adhesive - Stash


 I am so happy that 2 Cute Rubber Stamps is back in the swing of things! Heidi has some new ideas, new stamps, & a whole lot of fun planned for the days ahead. Remember, you can visit the 2 Cute DT Blog HERE for some inspiration & more details on the current Valentine challenge. There you will be redirected to Heidi's blog HERE & the Store HERE to play along, grab some freebies & have a chance to win $15 worth of cling or digi stamps...your choice! And don't forget to check back tomorrow...I have a post for YMH featuring some awesome Prima & Tattered Angels goodies. Until then, Happy Craftin'!

I'm also entering my card into the following challenges!

Kraftin' Kimmie Stamps - Seeing Red
Craft Your Days Away - Photo Inspiration (Red=Love!)
Stamp Something - Digi Day
Crafty Creations - Red, Red Rose
EIC - Inspired by Daisy Petal's Loves Warmth Headband
Really Reasonable Ribbon - Color Combo

Thursday, February 3, 2011

XOXO...Love is in Air at AiFactory!

 Love is in the air! As is the snow...LOL! If you are like us, we just had a major blizzard & have been trapped inside the house since Tuesday. It doesn't look like anyone is going anywhere for the next day or so either, so more time to spend with the family & crafting...woo hoo! And with that, I want to share with you my latest card for the AiFactory DT featuring this adorably cute digi stamp from the Ella Collection. Isn't she soooo cute?! I just loved playing with her! If you want to grab Ella for yourself, visit HERE! You can also purchase a Love You Ella Digi Stamp Set by visiting HERE! I also want to give credit where it is due because I was totally inspired to create this card using a LO I found HERE at Prairie Paper & Ink. Loved Amy's design & just switched a few things up to give it my own flair!


Supplies
Coloring Pencils - Prima
Pen - Black Copic Atyou Spica Glitter Pen
Cardstock - Stampin' Up, Paper Temptress
Patterned Paper - The Paper Studio (black polka dot), Target $ Spot (red hearts)
Ribbon - Michael's
Sentiment/Ink - Stampin' Up
Flowers - Prima
Stash - Buttons, Floss, Adhesives


Thanks so much for stopping by! I hope you take the chance to join in our current challenge, Red/Pink, at AiFactory. There is also some fabulous inspiration on the web site too, & don't forget all the fun digi's available in the AiFactory Store! Until next time, Happy Craftin'!

I'm also entering my creation into the following challenges!

AiFactory - Red/Pink
Speedy the Cat - Valentine Card
Cupcake Inspirations - Inspiration Photo (inspired by hearts)
Bee Crafty - Hearts
EIC - Inspired by Too Cute Kawaii Little Sweetheart Valentine Earrings HERE
Paper Play - Stamp It Out
Kraftin' Kimmie Stamps - Reduse, Reuse, Recycle (red ribbon is from Christmas gift)
Craft Your Days Away - Love
Digi Stamps 4 Joy - Flower Power
Papertake Weekly - Anything Goes + Flowers
Moxie Fab World - Tuesday Trigger (Inspired by hearts/valentine feel)
Embellish Magazine - Hearts

Related Posts with Thumbnails